Today, I decided it would be a sewing day. I had a few choices of what to sew, like sewing on binding, but that didn't really appeal. I needed something a little more creative so I started digging around in my fabrics and pulled out a combination of teals which I thought would work well for place mats on my table. Not that I usually use brown that much, but today I had a feeling that I should include a golden brown with the selection.
I cut some batting and backings an inch or so larger than the finished size I wanted, and draw a few notes and measurements on a piece of paper.

Collection of fabrics, batting and backing
For some reason I had strips and rectangle shapes on my mind so that's what I drew.
I cut a number of strips and jotted down the measurements so I could recall for the next placement. Of course, who says they have to be all the same? You could do any width strips and just build it up to the size you want.

Strips cut ready to start
I started mine with a 2" x 3" rectangle for my 11" x 15" place mat. (Normally I'd probably make these 12" x 16" but my batting wasn't quite big enough).
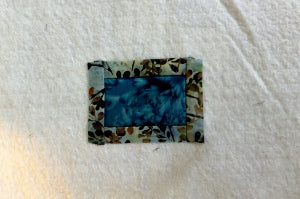
I measured through the middle of the batting and the 2" x 3" rectangle and aligned the center points of both so I knew the rectangle was exactly square in the middle.

Align the rectangle in the center of batting
My first strip was just 3/4" wide to give me a 1/4" finish. I cut two strips 3" long and placed them right side down on top of the rectangle so raw edges were even and then sewed along the seam - that is, the long side of the rectangle.
I then repeated the same for the other side and pressed both strips over the seam allowance.

First strips stitched ready to press out
Notice how I'm using the quilt-as-you-go method. After all strips are added, there will be no more quilting required. This is because I'm stitching through all the layers.

First strips pressed in place
Now I cut TWO strips 2 1/4" in length and added them to the other sides.
That was easy, the first round is on.
First round complete
For the second round, I made the side strips wider than the top and bottom since we have more width to cover than height. My strips were cut at 1 1/4" wide and 1 1/2" wide. I added these strips in the same way by sewing on the top and bottom strips first and then the sides.

Second round
For the third round, I used the same width on both sides again. My strips were cut at 1" wide. As I began to put these on, I noticed how easy it was to get the strip crooked so I used the inner seam as a guide, aligning the inner raw edge to it, then sewing the strip in place. This made it much easier to control.

Third round
My fourth round had uneven strips once again. I used 1 1/2" strips for the top and bottom, and 2" strips for the sides. These larger strips do make it grow faster.

Fourth round
The golden brown strips were also uneven at 1 1/4" for the top and bottom, and 1 1/2" for the side strips. I noticed at this point as I was making two place mats at the same time, it always pays to check where the second one is. Somehow mine got caught under the one I was sewing and it attached itself to the first. That sure makes setting the table difficult!

Oops careful you don't sew the wrong pieces together!
My final round was cut from a navy blue batik with birds on it. I cut my strips at 2" for the top and bottom, and 2 1/2" for the sides. This made up the full 11" x 15" size.
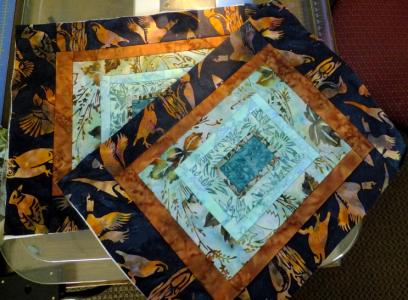
Strip pieced place mats
Now all that is left is to bind them off.
Try one or two, they are fun and a great way to use up strips and small pieces of fabric. I'd love to see a photo too!
For more quilting ideas, join our FREE newsletter at Arbee Designs. Join today and receive another free pattern. Arbee Designs Newsletter subscription

